Archive
SQL Error – Windows could not start the SQL Server (MSSQLSERVER) on Local Computer (moved Master DB)
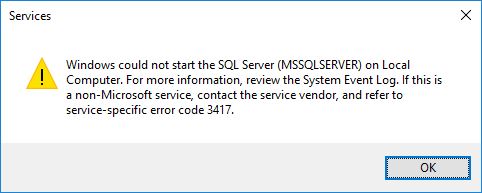
I was trying to move my Master DBs to another folder by using steps mentioned in my one of [previous blog post]. But after all steps, when I tried to Start the services I got error with following popup:
Error Description:
Windows could not start the SQL Server (MSSQLSERVER) on Local Computer. For more information, review the System Event Log. If this is a non-Microsoft service, contact the service vendor, and refer to service-specific error code 3417.
–> So, I checked the error log file and it showed the reason for error.
Default location: C:\Program Files\Microsoft SQL Server\MSSQL13.MSSQLSERVER\MSSQL\Log\
…
2016-06-27 12:18:28.02 Server The service account is ‘NT Service\MSSQLSERVER’. This is an informational message; no user action is required.
2016-06-27 12:13:33.30 Server Registry startup parameters:
-d E:\SystemDatabases\Master\master.mdf
-e C:\Program Files\Microsoft SQL Server\MSSQL13.MSSQLSERVER\MSSQL\Log\ERRORLOG
-l E:\SystemDatabases\Master\mastlog.ldf
2016-06-27 12:13:33.30 Server Command Line Startup Parameters:
-s “MSSQLSERVER”
…
2016-06-27 12:13:33.41 spid5s [INFO] HkHostDbCtxt::Initialize(): Database ID: [1] ‘master’. XTP Engine version is 0.0.
2016-06-27 12:18:28.12 spid5s Starting up database ‘master’.
2016-06-27 12:18:28.13 spid5s Error: 17204, Severity: 16, State: 1.
2016-06-27 12:18:28.13 spid5s FCB::Open failed: Could not open file E:\SystemDatabases\Master\master.mdf for file number 1. OS error: 5(Access is denied.).
2016-06-27 12:18:28.13 spid5s Error: 5120, Severity: 16, State: 101.
2016-06-27 12:18:28.13 spid5s Unable to open the physical file “E:\SystemDatabases\Master\master.mdf”. Operating system error 5: “5(Access is denied.)”.
2016-06-27 12:18:28.13 spid5s Error: 17204, Severity: 16, State: 1.
2016-06-27 12:18:28.13 spid5s FCB::Open failed: Could not open file E:\SystemDatabases\Master\mastlog.ldf for file number 2. OS error: 5(Access is denied.).
2016-06-27 12:18:28.13 spid5s Error: 5120, Severity: 16, State: 101.
2016-06-27 12:18:28.13 spid5s Unable to open the physical file “E:\SystemDatabases\Master\mastlog.ldf”. Operating system error 5: “5(Access is denied.)”.
2016-06-27 12:18:28.13 spid5s SQL Server shutdown has been initiated
–> The above error log (in bold) tells that the service account NT Service\MSSQLSERVER does not have access to the files moved to new location.
–> So, to provide access, go to the new folder location –> Right click and select Properties –> Go to Security tab, click on Edit –> click on Add, to add the Service Account. Apply the Service Account (here in my case NT Service\MSSQLSERVER) and change the Locations to your PC, as its a local Service Account:

Give “Full Control”, and click OK on popups.
Now Start the “SQL Server” services and this time it will work.
To check and confirm the new file location of Master DB, Execute following SQL query:
USE master
GO

SELECT *
FROM sys.database_files

SQL DBA – Move master Database to another drive – in simple steps
Well, there are times when you want to move your master database from the default location to some other drive. Now this activity cannot be done with the normal ALTER DATABASE statement with MODIFY FILE option. And you need a spacial handling for this case of master DB.
–> Let’s first check the location of master DB:
USE master
GO

SELECT * FROM sys.database_files

–> Now leave SSMS, and open SSCM i.e. SQL Server Configuration Manager. Here select “SQL Server Service”, and Rigth Click on the instance of SQL Server, and choose Properties. Now select the Startup Parameters tab.

Here you will see 3 line items:
1. -d is the path of the master data file.
2. -e is the path of the SQL error log file.
3. -l is the path of the master log file.
So, you need to update the 1st and 3rd ones. As I want to move my files to E:\SystemDatabases\Master\ location, so you just need to replace the existing path with following:
1. master data File:
-dC:\Program Files\Microsoft SQL Server\MSSQL13.MSSQLSERVER\MSSQL\DATA\master.mdf
-dE:\SystemDatabases\Master\master.mdf
2. master Log File:
-lC:\Program Files\Microsoft SQL Server\MSSQL13.MSSQLSERVER\MSSQL\DATA\mastlog.ldf
-lE:\SystemDatabases\Master\mastlog.ldf
–> Now Stop the SQL Server services, by going to: RUN –> services.msc
–> Manually Copy the master.mdf & mastlog.ldf files to the new location
–> Start the SQL Server services.
–> To confirm the new location, just execute following query and check the path:
USE master
GO

SELECT * FROM sys.database_files
SQL DBA – Database restored successfully, but stuck in (Restoring…) state
Today after restoring a database on my DEV machine from a PROD backup, I observed that the database was still showing as Restoring… in Object Explorer, and cannot be used. I again checked in SSMS results pane and it was showing as a successful restore with below message:
100 percent processed.
Processed 21713736 pages for database ‘dbName’, file ‘dbName_Data’ on file 1.
Processed 398 pages for database ‘dbName’, file ‘dbName_log’ on file 1.
RESTORE DATABASE successfully processed 21714134 pages in 506.682 seconds (334.808 MB/sec).
I checked online and found that I was using WITH NO RECOVERY option with my RESTORE DATABASE statement, like:
RESTORE DATABASE db_name WITH NO RECOVERY
… and by using above option, you make the Database to be unused, and allow more Roll Forward actions to continue with the next RESTORE DATABASE statements in sequence.
As this was not my intention, so I can simply mark by Database to stop accepting more Transaction Logs, by forcing the database out of Restoring state, by issuing following statement:
RESTORE DATABASE dbName WITH RECOVERY
Converting database ‘dbName’ from version 706 to the current version 852.
Database ‘dbName’ running the upgrade step from version 706 to version 770.
…
Database ‘dbName’ running the upgrade step from version 851 to version 852.
RESTORE DATABASE successfully processed 0 pages in 1.716 seconds (0.000 MB/sec).
… and my database was out from Restoring… state, and I could use it now !!!
SQL DBA – Configure multiple TempDB Database Files while installing SQL Server 2016 (new feature)
SQL Server 2016 allows you to scale up your database with Enhanced Database Caching, using support for multiple TempDB files per instance for multi-core environments. This reduces metadata- and allocation contention for TempDB workloads, improving performance and scalability.
Now you can configure the number of TempDB Database Files during the installation of a new Instance. While installation process in the Database Engine Configuration page you will see an extra option to set number of TempDB files.
Or, you can specify the number of files by using the new command line parameter: /SQLTEMPDBFILECOUNT
setup.exe /Q /ACTION="INSTALL" /IACCEPTSQLSERVERLICENSETERMS
 /FEATURES="SqlEngine" /INSTANCENAME="SQL15" ..
 /SQLTEMPDBDIR="D:\tempdb" /SQLTEMPDBFILECOUNT="4"
While installing via UI the label besides the Input Control below mentions: “The default value is 8 or the number of cores, whichever is lower. This value can be increased up to the number of cores”.

Update: Now with CTP 2.4 release the installer provides a separate tab for tempdb files configuration.

So, in my [C:\Program Files\Microsoft SQL Server\MSSQL13.SQLSERVER2016\MSSQL\DATA\] folder I could see 8 data files, with 1 log file:

SQL Database Recovery tool to repair corrupt MDF file
Database is a must have requirement of every type of Business systems, weather it is for customers, accounting or product. In order to create these databases the most common database system is Microsoft’s SQL Server. Due to its robustness and dynamic system facilities, it is a highly popular solution to manage a company’s business system.
A business database itself includes valuable data as it is a result of months hard work. What if this database becomes inaccessible due to multiple causes, and lead to a situation of data loss. Therefore, it is important to know about a reliable solution that can restore even the slightest part of database. Specialized SQL recovery tools are designed to perform SQL recoveries, therefore, they are highly in demands. Stellar Phoenix SQL Database Repair is one of a SQL database repair tool that gives the assurance of data recovery from damaged or corrupt SQL databases.
This review is about Stellar Phoenix SQL Database Repair product and its heights and short comings!
Disclaimer: This is not a paid review, and reflects my own experience while working with the product.
–> Testing Initiation
Stellar Phoenix SQL Database Repair is a popular product that claims to recover SQL database from all disaster scenarios. To check the higher promises of the product I have decided to check its accuracy and capabilities on one of my corrupt SQL server database, which is actually very large and highly important for me.
–> Installation Requirement Guide
Minimum system requirements for this recovery software are very normal as it needs A Pentium class processor, 1 GB of RAM, and 50 MB free disk space to be installed. This recovery tool is compatible with all the versions of SQL server, from MS SQL Server 7.0 to 2014, and all the versions of Windows operating systems, from Windows XP to 8 along with Windows Server 2003, 2008 and 2012.
When I have decided to test this product, I don’t need to setup a new system as all my system configurations fulfills all the requirements. One special quality I have noticed in this recovery application is; it automatically reconnects to the MS SQL server, in case of any disruption during the repair process to run the recovery smoothly.
–> Steps to select the database
Within few clicks you will be able to install the software on your machine. After successful installation, the main interface will show multiple menus and buttons to access various features of the software. Additionally, these various options can also be accessed through Quick Access Toolbar that is available at the top of the user interface, and can be customized accordingly.

In order to choose the database, you need to click on Select Database button and choose a MDF file that needs to be repaired and click ‘Repair’ to initiate the repair.
In case the location of your database file is unknown, Stellar Phoenix SQL Database Repair also avails you Find Database option that can find MDF file that you want to repair from selected drive and folder. After successful search, you will be able to see the list MS SQL Database files found in the selected drive or folder on the main window.

–> Initiate SQL database repair
Now, select the file from available list that needs to be repaired and select ‘Repair’ button to initiate repair. After successful completion, the left pane of windows displays list of repaired items along with Table, View, Synonyms, Defaults, Data Types, etc. in a tree format. The upper right pane displayed the content of selected items and the bottom pane displayed message log. You need to click on the item to preview the content of the listed items.

This software has a special feature that it counts all the records after successful repair. Although, this is an optional feature, but still worth for some users. To count my repaired records it took a good time, as the database contained a large number of items, it could be less for you if your database count is less.
–> Save Repaired items
To save the repaired files, just select the Save option available in the File menu. You could also finish this saving task by selecting ‘Save’ button from Quick Access Toolbar. The software asks you to Enter Server / Instance Name and choose a desired destination to save the repaired MDF file.
Now, select the Connect button to save the repaired MS SQL Database file. Make sure your SQL server is running during the repair process.
–> Additional Features to make the recovery task easier
I had a good experience with the software as it is easy to use and can quickly connect with the server. Here are some special features that will make your process much easier.
–> Find Specific Item from the list
After successful scan Stellar Phoenix SQL Database Repair allows you to find particular item(s) in tree view. You could use search bar available on the preview window along with two options and will give accuracy to your search.
–> Selective Recovery
This SQL database recovery tool can perform selective recovery of your database objects. You could choose to select specific objects that need to be recovered from the list and save them in your desired location.
–> Overall performance
Being developed by a reputed company (Stellar Data Recovery), Stellar Phoenix SQL Database Repair is genuinely a good software and after testing its complete modules I can say that it recovers all the objects of database along with multiple components, like Indexes, Views, Rules, User Defined Functions, Tables, Triggers, Stored Procedures, etc. It repaired my MDF and NDF files along with XML indexes and data types.
–> Sum up:
After using this product I can surely recommend this tool to SQL professionals who are looking for a tool that can help them in their disaster time. Although, the software is quite slow and will make you wait, but it will be worth when it displays the complete database which was inaccessible.


![]()
Current Visitors

StatCounter …since April 2012

 Leisure blog: Creek & Trails
- NMDC Hyderabad Marathon – My first 42k FM, cramps, training and fuelling
- Singapore (Part 2) – 6 days itinerary, sightseeing & attractions
- Singapore (Part 1) – Tickets, Visa, Hotel, Forex Card/Cash, Metro/Bus cards
- I got full refund of my flight tickets during COVID lockdown (AirIndia via MakeMyTrip)
- YouTube – Your Google Ads account was cancelled due to no spend
- YouTube latest update on its YPP (YouTube Partner Program) which may affect your channel
- Starting your own blog !!!
- How to file ITR (Income Tax Return) online AY 2017-18 (for simple salaried)
- Scam – Become a kin/hier and earn a fortune – via LinkedIn and Email
- Places to visit in and around Vizag (aka Visakhapatnam)
