Archive
Obfuscate column level data by using “Dynamic Data Masking” in SQL Server 2016
This time SQL Server 2016 has made good additions in area of Security by introducing features like:
1. Always Encrypted
2. Row Level Security, check my previous post,
3. Dynamic Data Masking, this post
4. and other security features, like Transparent Data Encryption (TDE), etc.
Dynamic Data Masking provides you support for real-time obfuscation of data so that the data requesters do not get access to unauthorized data. This helps protect sensitive data even when it is not encrypted, and shows obfuscated data at the presentation layer without changing anything at the database level.
Dynamic Data Masking limits sensitive data exposure by masking it to non-privileged users. This feature helps prevent unauthorized access to sensitive data by enabling customers to designate how much of the sensitive data to reveal with minimal impact on the application layer. It’s a Policy-based Security feature that hides the sensitive data in the result set of a Query over designated database columns, while the data in the database is not changed.
–> “Dynamic Data Masking” provides you three functions/options to Mask your data:
1. default(): just replaces the column value with ‘XXXX’ by default.
2. email(): shows an email ID to this format ‘aXXX@XXXX.com’.
3. partial(prefix,padding,suffix): gives you option to format and mask only some part of a string value.
We will see the usage of all these 3 masking functions below.
–> To setup Dynamic Data Masking on a particular Table you need to:
1. CREATE TABLE with MASKED WITH FUNCTION option at column level.
– Or ALTER TABLE columns by using this option if the table is already present.
2. Create Users and Grant Read/SELECT access for the above CREATED/ALTERED table.
–> 1. Create a sample table [dbo].[Customer] with masked columns:
CREATE TABLE dbo.Customer (
	CustomerID 	 INT IDENTITY PRIMARY KEY,
	FirstName 	 VARCHAR(250),
	LastName 	 VARCHAR(250) MASKED WITH (FUNCTION = 'default()') NULL,
	PhoneNumber  VARCHAR(12)  MASKED WITH (FUNCTION = 'partial(1,"XXXXXXXXX",0)') NULL,
	Email 		 VARCHAR(100) MASKED WITH (FUNCTION = 'email()') NULL,
	CreditCardNo VARCHAR(16)  MASKED WITH (FUNCTION = 'partial(4,"XXXXXXXXXX",2)') NULL,
);
–> Now insert some test records (fictitious figures):
INSERT INTO dbo.Customer (FirstName, LastName, PhoneNumber, Email, CreditCardNo)
VALUES
('Manoj',   'Pandey', '4442889882', 'manojp@gmail.com', '4563234576547834'),
('Saurabh', 'Sharma', '9812446452', 'sausha@gmail.com', '1243096778653487'),
('Vivek',   'Singh',  '6745239856', 'viveks@gmail.com', '8756341209876735'),
('Keshav',  'Singh',  '9867452387', 'keshav@gmail.com', '2938713685372618');
–> Let’s check the rows on [dbo].[Customer] table in context of my User:
SELECT * FROM dbo.Customer;
GO
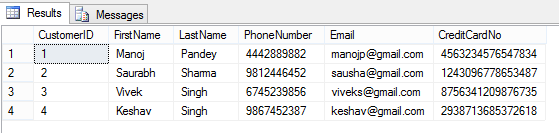
Here, I can see all the row/column values as I have full access to read the masked/sensitive data.
–> 2.a. Now let’s create a Test Account and just Grant Read access to [dbo].[Customer] table:
CREATE USER AnyUser WITHOUT LOGIN;
GO

GRANT SELECT ON dbo.Customer TO AnyUser;
GO
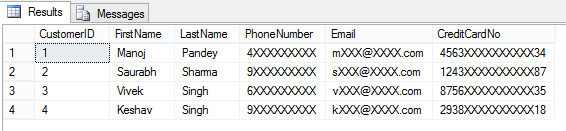
–> Let’s execute the SELECT statement on [dbo].[Customer] table in the Context of this new user account:
EXECUTE AS USER = 'AnyUser';
SELECT * FROM dbo.Customer;
REVERT;
GO

And you can see that the user is not able to see the masked data as he is not authorized to see it.
–> Removing Masking from a column by simple ALTER TABLE/COLUMN statement:
ALTER TABLE dbo.Customer
ALTER COLUMN LastName DROP MASKED;
GO

-- Let's check the table data again:
EXECUTE AS USER = 'AnyUser';
SELECT * FROM dbo.Customer;
REVERT;
GO
Here, now you are able to see contents of LastName columns, as the masking has been removed from this column by using simple ALTER TABLE/COLUMN statement.
–> 2.b. Granting the UNMASK permission to “AnyUser”:
GRANT UNMASK TO AnyUser;
GO

-- Let's check the table data again:
EXECUTE AS USER = 'AnyUser';
SELECT * FROM dbo.Customer;
REVERT;
GO
He is able to see all data unmasked when the UNMASK permission is granted to this user.
–> 2.c. Revoking back the UNMASK permission form the same user:
REVOKE UNMASK TO AnyUser;
GO
EXECUTE AS USER = 'AnyUser';
SELECT * FROM dbo.Customer;
REVERT;
GO
After Revoking UNMASK permission he is again not able to see complete data.
This way you can control access to your precious or PII data by masking the columns/fields that you don’t want to show to the external world or some set of users.
–> Final Cleanup:
DROP TABLE dbo.Customer;
GO
DROP USER [AnyUser]
GO
–> Check the same demo on YouTube:
SQL DBA – Configure multiple TempDB Database Files while installing SQL Server 2016 (new feature)
SQL Server 2016 allows you to scale up your database with Enhanced Database Caching, using support for multiple TempDB files per instance for multi-core environments. This reduces metadata- and allocation contention for TempDB workloads, improving performance and scalability.
Now you can configure the number of TempDB Database Files during the installation of a new Instance. While installation process in the Database Engine Configuration page you will see an extra option to set number of TempDB files.
Or, you can specify the number of files by using the new command line parameter: /SQLTEMPDBFILECOUNT
setup.exe /Q /ACTION="INSTALL" /IACCEPTSQLSERVERLICENSETERMS
 /FEATURES="SqlEngine" /INSTANCENAME="SQL15" ..
 /SQLTEMPDBDIR="D:\tempdb" /SQLTEMPDBFILECOUNT="4"
While installing via UI the label besides the Input Control below mentions: “The default value is 8 or the number of cores, whichever is lower. This value can be increased up to the number of cores”.

Update: Now with CTP 2.4 release the installer provides a separate tab for tempdb files configuration.

So, in my [C:\Program Files\Microsoft SQL Server\MSSQL13.SQLSERVER2016\MSSQL\DATA\] folder I could see 8 data files, with 1 log file:

Implementing “Row Level Security” (RLS) with “Filter Predicate” in SQL Server 2016 – Part 1
For an Organization its Data is the most important thing, and the Org’s IT department takes lot of measures to make sure data does not fall in wrong hands. The DBA’s and Application programmers setup different layers of security on top of data so that the user is only able to see the Filtered data/rows from a table that he has access to. DB programmers normally create abstracted Views or Stored Procedures with complex logic on top of the Tables by using other master-mapping tables that contains the user-data access key. Sometimes these security logics are not upto the standards, and may have various versions on a database and thus it becomes difficult to track, update and make them fail-proof. So, with SQL Server 2016 the new Row Level Security feature is going to handle this Out of the Box and as a Standard.
RLS or Row Level Security is a feature that enables fine grained control over access to rows in a table, allowing you to easily control which users can access which data with complete transparency to the application.
With this feature rows are filtered based on the Execution Context of the Query, rather than the current user access rights. A secure logic can be created to determine which user can see which rows and restrict any kind of data (rows) by designing a flexible and robust Security policy for a table.

–> To setup Row Level Security (RLS) on a particular table it needs only these simple steps:
1. Create Users and Grant Read/SELECT access for a Particular table.
2. Create a new Inline Table-Valued Function that will contain the Filter Predicate for that table. This Function Predicate can be a sophisticated business logic with multiple JOINs or a simple WHERE ManagerCode = ‘userHR’.
3. Create a new Security Policy for this table and add the above Function (Filter) Predicate to it.
Please note: that these Functions & Security Policies should be unique for a table. So to create RLS for an another table, you will need to create separate Function & Security Policy.
–> Step 1.a. Let’s create some test accounts: I will create three users for:
1. The CEO, over-all admin of the company data.
2. HR department head
3. Finance department head
CREATE USER userCEO WITHOUT LOGIN;
GO
CREATE USER userHR WITHOUT LOGIN;
GO
CREATE USER userFin WITHOUT LOGIN;
GO
–> Create a sample table [dbo].[Employee]: with a self-referencing Manager ID column.
CREATE TABLE dbo.Employees (
	[EmpCode] NVARCHAR(50),  -- Employee ID
	[EmpName] NVARCHAR(250), -- Employee/Manager Full Name
	[Salary]  MONEY,		 -- Fictious Salary
	[MgrCode] NVARCHAR(50)   -- Manager ID
);
GO
-> Now insert some test records:
-- Top Boss CEO
INSERT INTO dbo.Employees VALUES ('userCEO'	, 'CEO Top Boss'  , 800, NULL)

-- Next 2 levels under CEO
INSERT INTO dbo.Employees VALUES ('userHR'	, 'HR User'		  , 700, 'userCEO');
INSERT INTO dbo.Employees VALUES ('userFin'	, 'Finance User'  , 600, 'userCEO');

-- Employees under Kevin
INSERT INTO dbo.Employees VALUES ('manojp'	, 'Manoj Pandey'  , 100, 'userHR');
INSERT INTO dbo.Employees VALUES ('saurabhs', 'Saurabh Sharma', 400, 'userHR');
INSERT INTO dbo.Employees VALUES ('deepakb' , 'Deepak Biswal' , 500, 'userHR');

-- Employees under Amy
INSERT INTO dbo.Employees VALUES ('keshavk'	, 'Keshav K'	  , 200, 'userFin');
INSERT INTO dbo.Employees VALUES ('viveks'	, 'Vivek S'		  , 300, 'userFin');
GO
–> Let’s check the records before applying “Row Level Security”:
SELECT * FROM dbo.Employees; -- 8 rows
GO
As a normal SEELCT and without RLS, it just ignores my Execution Context and execute the Query and return all the 8 rows.
–> The Traditional way to setup the Row Level Security till now was as follows (a simple example):
-- Stored Procedure with User-Name passed as parameter:
CREATE PROCEDURE dbo.uspGetEmployeeDetails (@userAccess NVARCHAR(50))
AS
BEGIN
	SELECT *
	FROM dbo.Employees
	WHERE [MgrCode] = @userAccess
	OR @userAccess = 'userCEO'; -- CEO, the admin should see all rows
END
GO

-- Execute the SP with different parameter values:
EXEC dbo.uspGetEmployeeDetails @userAccess = 'userHR'  -- only 3 rows
GO
EXEC dbo.uspGetEmployeeDetails @userAccess = 'userFin' -- only 2 rows
GO
EXEC dbo.uspGetEmployeeDetails @userAccess = 'userCEO' -- all 8 rows
GO
The above method is prone to issues, like SQL Injection and any other user can apply other user’s User-Name and get the information that he is not allowed to see. With this type of method you have to apply another security layer at the application level so whenever a user executes the SP it gets executed with the same user’s User-Name.
–> The new Row Level Security feature let you:
– apply this security at the database level
– and there is no need to apply the WHERE clause filter for the User-Name.
This makes the security system more reliable and robust by reducing the surface area of your security system.
–> Step 1.b. Grant Read/SELECT access on the dbo.Employee table to all 3 users:
GRANT SELECT ON dbo.Employees TO userCEO;
GO
GRANT SELECT ON dbo.Employees TO userHR;
GO
GRANT SELECT ON dbo.Employees TO userFin;
GO
–> Step 2. Let’s create an Inline Table-Valued Function to write our Filter logic:
CREATE FUNCTION dbo.fn_SecurityPredicateEmployee(@mgrCode AS sysname)
    RETURNS TABLE
WITH SCHEMABINDING
AS
    RETURN SELECT 1 AS fn_SecurityPredicateEmployee_result
	-- Predicate logic
	WHERE @mgrCode = USER_NAME()
	OR USER_NAME() = 'userCEO'; -- CEO, the admin should see all rows
GO
This function returns value 1 when:
– a row in the MgrCode (i.e. the Manager Code) column is the same as the user executing the query (@@mgrCode = USER_NAME())
– or if the user executing the query is the Top Boss user (USER_NAME() = ‘userCEO’)
–> Step 3. Create a security policy adding the function as a filter predicate:
CREATE SECURITY POLICY ManagerFilter
ADD FILTER PREDICATE dbo.fn_SecurityPredicateEmployee(MgrCode)  -- Filter Column from dbo.Employee table
ON dbo.Employees
WITH (STATE = ON); -- The state must be set to ON to enable the policy.
GO
The above Security Policy takes the Filter Predicate Logic from the associated Function and applies it to the Query as a WHERE clause.
–> Now let’s again check the records after applying “Row Level Security”:
SELECT * FROM dbo.Employees; -- 0 rows,
GO
The simple “SELECT *” statement will fetch me zero rows after applying RLS, as my user ID is not configured to have access to any of those rows & Table.
–> And if you check in the Execution Plan of above SELECT statement without WHERE clause, it will show you the Filter Predicate that is added by the Security Policy defined in Step #3 for applying RLS on this table, which looks like this:
[TestManDB].[dbo].[Employee].[MgrCode]=user_name()
OR user_name()=N’userCEO’

–> Let’s check the 3 users we created and provided them customized access to the dbo.Employee table and rows in it:
-- Execute as our immediate boss userHR (3 rows):
EXECUTE AS USER = 'userHR';
SELECT * FROM dbo.Employees; -- 3 rows
REVERT;
GO

-- Execute as our immediate boss userFin:
EXECUTE AS USER = 'userFin';
SELECT * FROM dbo.Employees; -- 2 rows
REVERT;
GO

-- Execute as our Top boss userCEO (8):
EXECUTE AS USER = 'userCEO';
SELECT * FROM dbo.Employees; -- 8 rows
REVERT;
GO
–> The results of the above 3 SELECTs looks like this:

So, as you can see the three users we created resulted in different results:
– The HR & Finance users got just 3 & 2 rows, respectively.
– But the admin CEO user got all the 8 rows.
–> Thus, by using RLS Filter Predicate feature in SQL Server 2016 you can create your own customized Security by creating an Inline Table-Valued Function that is linked to the Security Policy for your Table.
–> Check Block Predicates with RLS in my [next post, Part 2].
–> Final Cleanup
DROP SECURITY POLICY [dbo].[ManagerFilter]
GO
DROP FUNCTION [dbo].[fn_SecurityPredicateEmployee]
GO
DROP TABLE [dbo].[Employee]
GO

DROP PROCEDURE dbo.uspGetEmployeeDetails
GO
Check the same demo on YouTube:
new CTP 2.1 update for SQL Server 2016 available for download
Today Microsoft announced an update of the recently released Community Technology Preview (CTP) 2 version of SQL Server 2016, the CTP 2.1.
[Register and Download the CTP 2.1 Evaluation version (180 days) here]
Direct download link:
– SQLServer2016CTP2.1-x64-ENU.box
– SQLServer2016CTP2.1-x64-ENU.exe
As per the Microsoft [SQL Server Blog], now people do not have to wait for several months for the release of next CTP versions. Now customers can experience the Rapid Preview models and bits for their dev & test purpose.
–> This rapid release includes some improvements and fixes to the new features added in SQL Server 2016 release, and as follows:
1. Stretch Database – Demo video
2. Query Store
3. Temporal Data, added support for computed columns and Period columns with HIDDEN flag – Demo video.
4. Columnstore Index, improved seek/scan performance – Demo video.
Check the [SQL Server blog] for all these updates in detail.
Time Travel with Temporal Tables in SQL Server 2016 – Part 2
In my [previous post] I discussed about Temporal Data, how it will be supported in SQL Server and how to CREATE Temporal or System-Versioned Tables.
–> Here in this post we will see how we can enable System-Versioning in an existing table containing data. I will also tweak the data to show you the demo on how you can point to a time back in history and get details relative to that time. This will be like Time Travelling to past and seeing record details as if its current data, without much change to the current table’s data-structure.
1. Let’s create a sample table [dbo].[Employee] and populated it by JOINing some tables on [AdventureWorks] Database:
USE [TestManDB]
GO

;WITH CTE AS (
	SELECT
		E.BusinessEntityID, P.FirstName, P.LastName, D.Name AS DepartmentName,
		ROW_NUMBER() OVER(PARTITION BY E.BusinessEntityID ORDER BY D.ModifiedDate DESC) as RN

	FROM [AdventureWorks2014].[HumanResources].[Employee] E
	JOIN [AdventureWorks2014].[Person].[Person] P
	ON P.BusinessEntityID = E.BusinessEntityID
	JOIN [AdventureWorks2014].[HumanResources].[EmployeeDepartmentHistory] DH
	ON DH.BusinessEntityID = E.BusinessEntityID
	JOIN [AdventureWorks2014].[HumanResources].[Department] D
	ON D.DepartmentID = DH.DepartmentID
)
SELECT BusinessEntityID, FirstName, LastName, DepartmentName
	INTO dbo.Employee
FROM CTE
WHERE RN = 1
GO
2. The System Versioned Temporal table [dbo].[Employee] must have Primary Key defined: otherwise you will get the same error message (Msg 13553).
ALTER TABLE dbo.Employee
	ADD CONSTRAINT PK_BusinessEntityID PRIMARY KEY (BusinessEntityID)
GO
3. Now to make [dbo].[Employee] table System Versioned we will add:
– Two Audit columns of datetime2 datatype to store Start & End datetime.
– Use PERIOD FOR SYSTEM_TIME clause to associate these two columns as System Time.
ALTER TABLE dbo.Employee ADD
	StartDate datetime2 GENERATED ALWAYS AS ROW START NOT NULL
		DEFAULT CAST('1900-01-01 00:00:00.0000000' AS DATETIME2),
	EndDate	  datetime2 GENERATED ALWAYS AS ROW END   NOT NULL
		DEFAULT CAST('9999-12-31 23:59:59.9999999' AS DATETIME2),
PERIOD FOR SYSTEM_TIME (
	StartDate,
	EndDate
)
GO
4. After all pre-requisites let’s enable the System-Versioning on [dbo].[Employee] table:
ALTER TABLE dbo.Employee
	SET (SYSTEM_VERSIONING = ON (HISTORY_TABLE = dbo.EmployeeHistory))
GO
–> So, as soon you enable the System-Versioning the SQL Engine creates an another History table with similar schema and nests it under the main Temporal table, let’s check both the tables columns and contents:
SELECT TOP 10 * FROM dbo.Employee
SELECT TOP 10 * FROM dbo.EmployeeHistory
GO

You can see above the History table is empty as there are no updates on the Parent table. I’ve rounded the 5th row because I will update this row in next step for the demo.
5. Let’s make some updates on the parent Temporal Table (5th row): SQL Engine will automatically populate the History table.
UPDATE dbo.Employee
SET FirstName = 'Gabriel'
WHERE BusinessEntityID = 5
GO

UPDATE dbo.Employee
SET DepartmentName = 'Research and Development'
WHERE BusinessEntityID = 5
GO

UPDATE dbo.Employee
SET DepartmentName = 'Executive'
WHERE BusinessEntityID = 5
GO

-- Let's check the records again:
SELECT * FROM dbo.Employee WHERE BusinessEntityID = 5
SELECT * FROM dbo.EmployeeHistory WHERE BusinessEntityID = 5
GO
You will see that after doing 3 UPDATEs on the parent Temporal Table the History table [dbo].[EmployeeHistory] is populated with 3 rows that contains the older versions on data in [dbo].[Employee] table across all columns.
6. Ok, now I’ll do some tweaks on the System Time column values of [dbo].[Employee] table.
– First of all I will switch OFF the System-Versioning on dbo.Employee table.
– Now I will update the date of System Time columns, set it to back in history (5-10 days back for an effective demo).
– Enable back the System-Versioning
ALTER TABLE [dbo].[Employee] SET ( SYSTEM_VERSIONING = OFF )
GO

update dbo.EmployeeHistory
set EndDate = '2015-06-01 18:47:07.5566710'
where BusinessEntityID = 5 AND EndDate = '2015-06-09 18:47:07.5566710'

update dbo.EmployeeHistory
set StartDate = '2015-06-01 18:47:07.5566710',
	EndDate = '2015-06-05 18:47:28.0153416'
where BusinessEntityID = 5 AND StartDate = '2015-06-09 18:47:07.5566710'

update dbo.EmployeeHistory
set StartDate = '2015-06-05 18:47:28.0153416'
where BusinessEntityID = 5 AND StartDate = '2015-06-09 18:47:28.0153416'
GO

ALTER TABLE [dbo].[Employee]
	SET (SYSTEM_VERSIONING = ON (HISTORY_TABLE = dbo.EmployeeHistory))
GO

-- Check the data after datetime changes:
SELECT * FROM dbo.Employee WHERE BusinessEntityID = 5
SELECT * FROM dbo.EmployeeHistory WHERE BusinessEntityID = 5
GO

–> Ok, now here comes the most interesting part of the topic i.e. “Time Travel”:
SQL Server engine provides you FOR SYSTEM_TIME AS OF {datetime_value} option with your SELECT query to get details pointing to any time in the history, let’s check this here:
SELECT *
FROM dbo.Employee
FOR SYSTEM_TIME AS OF '2015-01-01'
WHERE BusinessEntityID = 5

SELECT *
FROM dbo.Employee
FOR SYSTEM_TIME AS OF '2015-06-03'
WHERE BusinessEntityID = 5

SELECT *
FROM dbo.Employee
FOR SYSTEM_TIME AS OF '2015-06-07'
WHERE BusinessEntityID = 5

SELECT *
FROM dbo.Employee
FOR SYSTEM_TIME AS OF '2015-06-10'
WHERE BusinessEntityID = 5
GO
The above four Queries will show you results from the History Table by pulling out the records for the particular date you mentioned by checking the date ranges in the Audit columns:

–> Let’s check the Execution Plan of the 4th SELECT statement:

So, you can see that you are just querying the dbo.Employee Temporal table, but SQL Engine is internally also querying the dbo.EmployeeHistory table and concatenating (UNION) the rows from both the operators.
–> Final Cleanup: before Dropping the Temporal & History tables, you need to switch OFF the System Versioning feature in the parent table.
ALTER TABLE [dbo].[Employee] SET ( SYSTEM_VERSIONING = OFF )
GO
DROP TABLE [dbo].[Employee]
GO
DROP TABLE [dbo].[EmployeeHistory]
GO
–> You can also check this demo in this video:


![]()
Current Visitors

StatCounter …since April 2012

 Leisure blog: Creek & Trails
- NMDC Hyderabad Marathon – My first 42k FM, cramps, training and fuelling
- Singapore (Part 2) – 6 days itinerary, sightseeing & attractions
- Singapore (Part 1) – Tickets, Visa, Hotel, Forex Card/Cash, Metro/Bus cards
- I got full refund of my flight tickets during COVID lockdown (AirIndia via MakeMyTrip)
- YouTube – Your Google Ads account was cancelled due to no spend
- YouTube latest update on its YPP (YouTube Partner Program) which may affect your channel
- Starting your own blog !!!
- How to file ITR (Income Tax Return) online AY 2017-18 (for simple salaried)
- Scam – Become a kin/hier and earn a fortune – via LinkedIn and Email
- Places to visit in and around Vizag (aka Visakhapatnam)
