Archive
Spinning up a new Linux VM on Microsoft Azure
First of all a very very Happy New Year to all of you !!!
This is my first blog post in 2017, and I’ll start with the most happening thing with SQL Server, which is SQL Server for Linux.
So today first of all we will see how to setup a Linux VM on Microsoft Azure cloud. And in next posts I’ve show how can we Install & Setup SQL Server on Linux.
I will use Ubuntu Server 16.04 LTS (Xenial Xerus) version from Azure Marketplace, and show how to setup a Linux VM in a step by step process.
All you need is a Microsoft Azure account, if you have not setup, please do it from here.
1. Go to portal.azure.com and login with your credentials.
2. Click on the “+” icon, under “Marketplace” select Compute and under “Featured Apps” select Ubuntu Server.

3. The “Deployment Model” must be showing as Resource Manager by default, if not select form the drop-down list, and click on Create button.

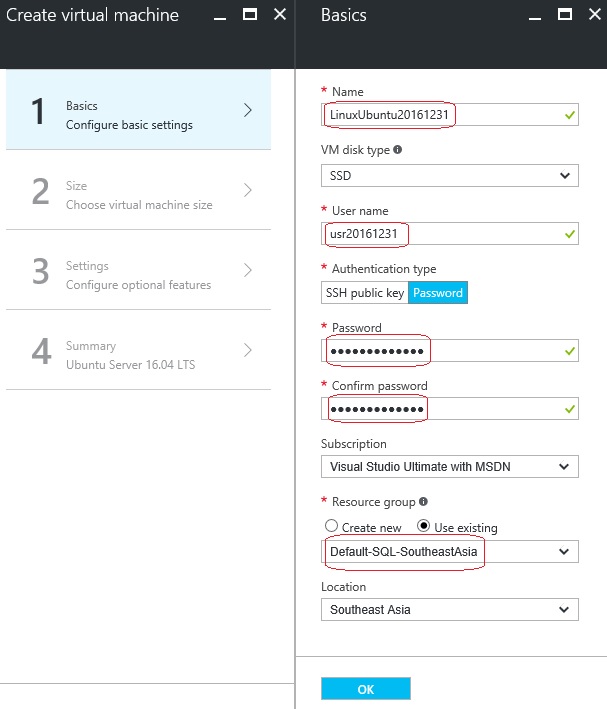
4. Now on the Create virtual machine window, under “1. Basic” section provide:
– Name: new name for your Linux VM
– VM disk type: select Disk type, SSD or HDD
– User name: provide a unique user name for Admin purpose
– Authentication type: I selected “Password”
– Password & Confirm password
– Subscription: will show you your current subscription
– Resource Group: Provide a new name or select from the drop-down list
– Location: select location as per your preference and available in the list.
… and click OK.
5. On “2. Size” section Choose a size for your VM. I selected the DS1_v2 Standard, the cheapest one, finally click on Select button.

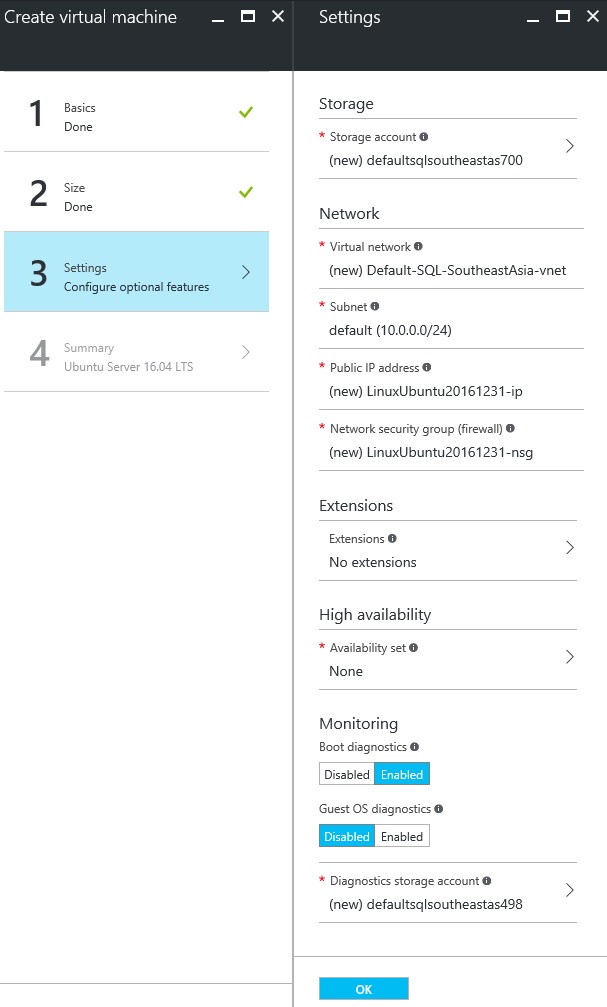
6. On 3. Settings section check the properties, I’ve left them as default for now, and click OK:
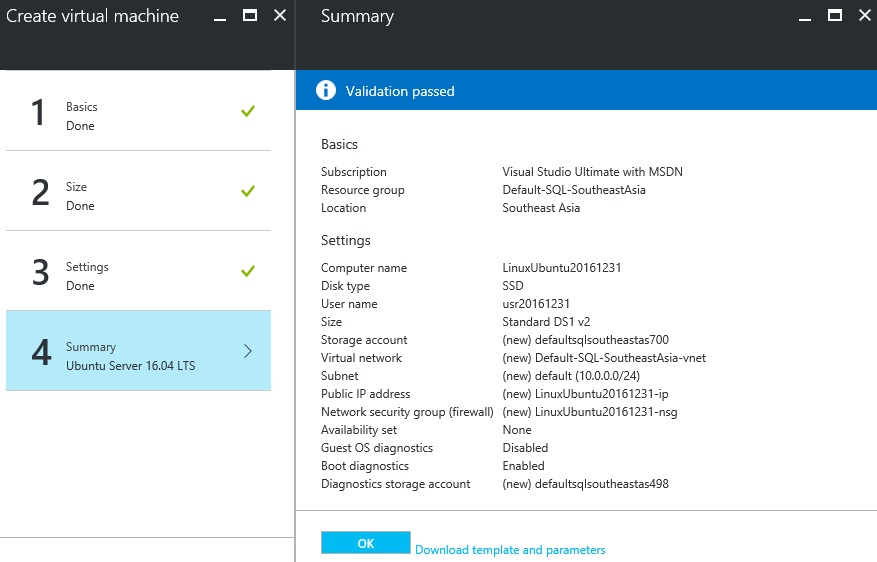
7. On the “4. Summary” section, the Portal will do various validations, just confirm all the settings and click OK.
8. And after few seconds or minutes your new Ubuntu Linux VM will be created and you can check the new widget appearing on your Dashboard as shown below:

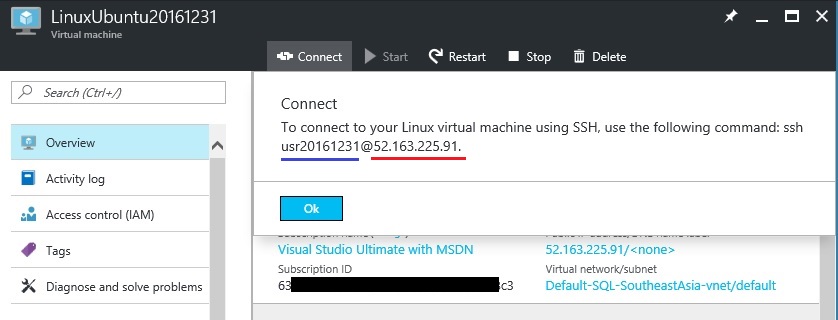
9. Now to get the NIC (network Interface Card) or the User Name & IP address of your VM, click on the widget.
It will open a new window where you can check all the details related to your new Linux VM.
Just click the Connect button at the top which will show you the details so that you can connect via SSH or Telnet.
10. Now to connect the Linux VM you can either:
a. SSH directly from a Mac or Linux Terminal workstation.
b. Or, if you are on a Windows workstation, you need to use PuTTY, MobaXTerm or Cygwin to SSH to the Linux Azure VM.
Here, we will try connecting from a Windows workstation, so we will download PuTTY from www.putty.org
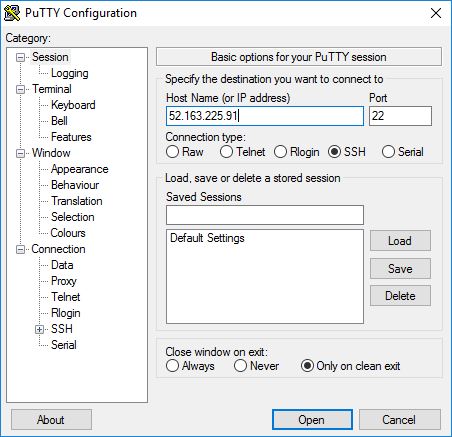
The downloaded PuTTY is a simple EXE application, just open it. Here we will provide the IP address that we saw above, you can copy and paste it as shown below and click Open:
11. This will open a PuTTY command shell window which will prompt you to enter the Linux username & password that you set in previous steps, please apply as shown below:

12. After you successfully logged in you will see some welcome message from Ubuntu with other details.
Just to make sure I’m really connected to a Linux command shell, I tried executing a Unix command “ls /” to list all the files & directories in the root drive.

So, this is how you can simply Create or Spin up a Linux VM in few minutes !!!
In my [next post] I’ll setup or install SQL Server vNext on this Linux VM and show you how can we connect via SSMS from a Windows workstation.
–> You can also watch this on YouTube:


![]()
Current Visitors

StatCounter …since April 2012

 Leisure blog: Creek & Trails
- NMDC Hyderabad Marathon – My first 42k FM, cramps, training and fuelling
- Singapore (Part 2) – 6 days itinerary, sightseeing & attractions
- Singapore (Part 1) – Tickets, Visa, Hotel, Forex Card/Cash, Metro/Bus cards
- I got full refund of my flight tickets during COVID lockdown (AirIndia via MakeMyTrip)
- YouTube – Your Google Ads account was cancelled due to no spend
- YouTube latest update on its YPP (YouTube Partner Program) which may affect your channel
- Starting your own blog !!!
- How to file ITR (Income Tax Return) online AY 2017-18 (for simple salaried)
- Scam – Become a kin/hier and earn a fortune – via LinkedIn and Email
- Places to visit in and around Vizag (aka Visakhapatnam)
