Archive
SQL DBA – Move tempDB to another drive in simple steps
Today we will see how to move your SQL Server tempDB database from its default location to an another drive. Reason could be anything like Disk maintenance, Failure recovery, etc. This can be done by using the normal ALTER DATABASE statement, we will see how.
–> Script: Let’s first check the location of master DB:
USE tempdb
GO

SELECT * FROM sys.database_files
![]()
–> Now execute the ALTER DATABASE statement with MODIFY FILE option:
USE master;
GO

ALTER DATABASE tempdb
MODIFY FILE (
	NAME = tempdev,
	FILENAME = 'E:\SystemDatabases\tempDB\tempdb.mdf'
);
GO

ALTER DATABASE tempdb
MODIFY FILE (
	NAME = templog,
	FILENAME = 'E:\SystemDatabases\tempDB\templog.ldf'
);
GO
The file “tempdev” has been modified in the system catalog. The new path will be used the next time the database is started.
The file “templog” has been modified in the system catalog. The new path will be used the next time the database is started.
–> Now Restart the SQL Server services from SSMS Object Explorer or by going to RUN –> services.msc.
As soon as the SQL Server services are started, the SQL engine re-creates the tempDB database files. So there is no need to physically move them to the new location.
–> To confirm the new location, just execute following query and check the path:

SQL Server 2014 CTP1 now Available… download now!!!

Finally the wait is over to get your hands dirty on SQL Server 2014 as the first Community Test Preview (CTP1) is released and is available for download form the Microsoft Official Site.
–> Download the SQL Server 2014 CTP1 [here].
You will need to login with your Windows Live ID to go to the download page.
–> Microsoft has released following Installation Limitations for SQL Server 2014 Community Technology Preview 1 (CTP1):
- Microsoft SQL Server 2014 CTP1 is pre-release software and should be installed only on a clean machine. It does not support upgrade from or side-by-side installations with any previous version of SQL Server, including SQL Server 2012. In addition it does not work with or support side by side installations with any client redistributables of SQL Server such as feature pack components, Visual Studio 2012 or earlier versions, SQL Server Data Tools, Data Tier Application Framework, etc.
- To administer Microsoft SQL Server 2014 CTP1 use only SQL Server Management Studio that ships as a part of Microsoft SQL Server 2014 CTP1.
- The Microsoft SQL Server 2014 CTP1 release is NOT supported by Microsoft Customer Services and Support (CSS).
- The Microsoft SQL Server 2014 CTP1 release is only available in the X64 architecture.
- The Microsoft SQL Server 2014 CTP1 release is a NON-PRODUCTION release and should not be installed and used in production environments.
- The Microsoft SQL Server 2014 CTP1 release does NOT have an associated Microsoft SQL Server 2014 CTP1 Feature Pack.
- The Microsoft SQL Server 2014 CTP1 release on Windows Azure VM is only intended for functional development and testing, and not for performance testing.
- The Microsoft SQL Server 2014 CTP1 release contains branding and versioning from older Microsoft SQL Server releases.
–> System Requirements to install SQL Server 2014 CTP1: [here]
- Minimum Windows 8 or Windows Server 2012
- X64 architecture only
- MS.Net Framework 3.5 SP1
–> Product Detail Page, [link].
Imp Note: As the first limitation point says to install it on a Clean Machine, this means the machine should not have any Pre-Releases of SQL Server and/or Visual Studio Installed.
So, to start with SQL Server 2014 CTP1 you need to get a clean machine, or a new machine with a freshly installed Windows OS.
Check more on SQL Server 2014 CTP1, here: http://www.microsoft.com/en-us/sqlserver/sql-server-2014.aspx
Excel pasting dataset in single column, copied from SSMS Results grid
Today while copying data from SQL Server Management Studio (SSMS) into Excel, I observed that all the data is getting copied only to the first column of Excel Sheet. The Data from SSMS in multiple columns was not getting copied to different columns in Excel.
I realized that the previous day I had splitted some comma separated data in Excel to separate columns. So I think Excel saved the same comma-separated setting and thus not allowing to split data in TAB separated format form SSMS.

So I had to do the split of the dataset again, by going to Data ribbon –> Text to Columns option:
Select the Delimiter as TAB and click Next/Finish:
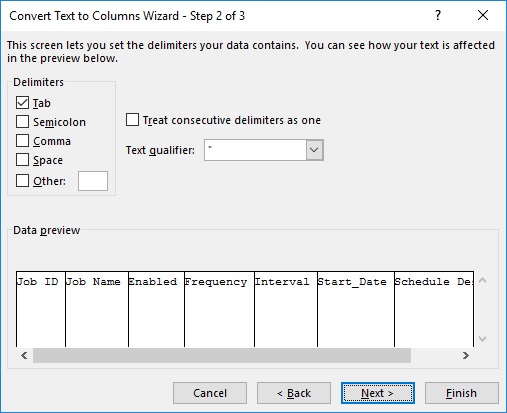
The Dataset in Excel will be separated in different columns just like in the SSMS Results grid:

Clustered Index will not always guarantee Sorted Rows
In my previous post I discussed about the how Clustered Index’s Data-Pages and Rows are allocated in memory (Disk). I tried to prove that that Clustered Indexes do not guarantee Physical Ordering of Rows. But instead they are Logically Ordered and Sorted.
As they are Logically Sorted and when you query a table without an “ORDER BY” clause you get Sorted Rows, but this is not what will happen always. You can also get rows in Unsorted Order, so to get Sorted rows always apply an “ORDER BY” clause. Here in this post we will see under what circumstances a table will not return Sorted rows:
–> Let’s create a simple table with a Clustered Index on it and add some records:
-- Create  table with 2 columns, first beign a PK and an IDENTITY column:
CREATE TABLE test2
(
	i INT IDENTITY(1,1) PRIMARY KEY NOT NULL,
	j INT
)

-- Let's insert some records in random order on second column:
INSERT INTO test2 (j)
SELECT 500 UNION ALL
SELECT 300 UNION ALL
SELECT 900 UNION ALL
SELECT 100 UNION ALL
SELECT 600 UNION ALL
SELECT 200

-- Now we will query the table without using ORDER BY clause:
SELECT * FROM test2
–> Output:

You get sorted rows, as the Execution plan shows that Clustered Index was used to fetch the records.
–> Now, what if this table also has a Non Clustered Index, let’s see:
-- We will create a Non Clustered Index on the same table on second column:
CREATE INDEX NCI_test ON test2 (j)

-- Again query the table without using ORDER BY clause:
SELECT * FROM test2
–> Following is the Output of the second SELECT query above:
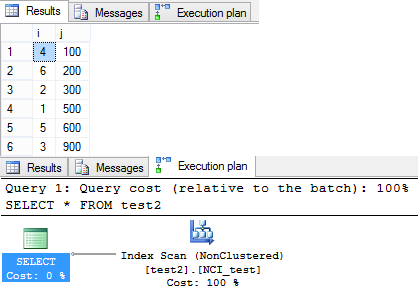
This time the query returned rows in un-ordered fashion. As you can see in the Execution plan Query optimizer preferred to do a Non Clustered Scan. Thus the records were returned in un-ordered fashion.
–> Now, If you add an ORDER BY Clause to your SELECT Query how does it return rows:
-- Added an ORDER BY Clause:
SELECT * FROM test2 ORDER BY i
–> Following is the Output of the third SELECT query above:

After adding an “ORDER BY” clause the query optimizer preferd to use the Clustered Index and returns rows in Ordered fashion again.
-- Final Cleanup
DROP TABLE test2
So, it is necessary to provide an “ORDER BY” clause to your Queries when you expect to get sorted results, even if the table has Clustered Index on it.
Script out all SQL Jobs – MSDN TSQL forum
–> Question:
Hi experts,
I have approx 200 jobs in production env.
Can any one give me the script, which will script all SQL Jobs for me. I wont need any manual process please, any code, or shell script which script all SQL Jobs so that I can have some sort of backup for them, MSDB backup is not choice.
–> My Answer:
In SSMS, open “Object Explorer Details” by pressing F7.
Go to “SQL Agent” -> Jobs -> Select all jobs, Right click and “Script Job as” -> “Create to”
All, Jobs will be scripted at once.
Ref link.


![]()
Current Visitors

StatCounter …since April 2012

 Leisure blog: Creek & Trails
- NMDC Hyderabad Marathon – My first 42k FM, cramps, training and fuelling
- Singapore (Part 2) – 6 days itinerary, sightseeing & attractions
- Singapore (Part 1) – Tickets, Visa, Hotel, Forex Card/Cash, Metro/Bus cards
- I got full refund of my flight tickets during COVID lockdown (AirIndia via MakeMyTrip)
- YouTube – Your Google Ads account was cancelled due to no spend
- YouTube latest update on its YPP (YouTube Partner Program) which may affect your channel
- Starting your own blog !!!
- How to file ITR (Income Tax Return) online AY 2017-18 (for simple salaried)
- Scam – Become a kin/hier and earn a fortune – via LinkedIn and Email
- Places to visit in and around Vizag (aka Visakhapatnam)
