Archive
Install and Configure SQL Server 2017 on Linux Azure VM

In my [previous blog] post we saw how to Create a new Linux VM on Azure. After creating it we connected it from a Windows workstation by using PuYYT tool and tested one Unix command.
Here in this post we will see how we can install SQL Server on Linux.
Microsoft is working on a new SQL Server vNext version that will work both on Windows as well as Linux. So with the recent [CTP 1.x] release we can see how does it look like on both the Operating Systems and get some hands on with it.
–> Get the Repository and Install SQL Server:
1. Import the public repository GPG keys:
curl https://packages.microsoft.com/keys/microsoft.asc | sudo apt-key add -
2. Register the Microsoft SQL Server Ubuntu repository:
curl https://packages.microsoft.com/config/ubuntu/16.04/mssql-server.list | sudo tee /etc/apt/sources.list.d/mssql-server.list
3. Re-synchronize the Package index files from their sources, to get information of the newest versions of packages and their dependencies, and finally Install MSSQL-Server package:
sudo apt-get update
sudo apt-get install -y mssql-server
After Install it will ask you to run SQL Server setup by following message:
Please run /opt/mssql/bin/sqlservr-setup to complete the setup of Microsoft(R) SQL Server(R)
4. Now post install, we need to configure SQL Server and set the SA password, and SQL services.
sudo /opt/mssql/bin/sqlservr-setup
The Configuration gives following prompts in between:
Please enter a password for the system administrator (SA) account:
Please confirm the password for the system administrator (SA) account:
Setting system administrator (SA) account password…
Do you wish to start the SQL Server service now? [y/n]: y
Do you wish to enable SQL Server to start on boot? [y/n]: y
5. Post Configuration you can verify that the service is running:
systemctl status mssql-server


–> Install Tools: This will install the command-line tools (sqlcmd & BCP), Microsoft ODBC drivers, and their dependencies.
6. Re-synchronize the Package index files, and Install MSSQL-Tools:
curl https://packages.microsoft.com/keys/microsoft.asc | sudo apt-key add –
curl https://packages.microsoft.com/config/ubuntu/16.04/prod.list | sudo tee /etc/apt/sources.list.d/msprod.listsudo apt-get update
sudo apt-get install mssql-tools unixodbc-devsudo ln -sfn /opt/mssql-tools/bin/sqlcmd-13.0.1.0 /usr/bin/sqlcmd
sudo ln -sfn /opt/mssql-tools/bin/bcp-13.0.1.0 /usr/bin/bcp
–> Connect to SQL instance:
9. We will use sqlcmd to connect to SQL Server vNext on our Linux VM. Run the sqlcmd command with following params:
– S: Server Name
– U: User Name
– P: Password
sqlcmd -S localhost -U SA -P ”
–> Run SQL Queries:
10. Now after connecting to the SQL Linux instance, let’s test come queries:
We will check the Version of SQL Server and list out system Databases:
select @@version
go

select database_id, name, create_date from sys.databases
go
Output of version statement:
Microsoft SQL Server vNext (CTP1.1) – 14.0.100.187 (X64)
Dec 10 2016 02:51:11
Copyright (C) 2016 Microsoft Corporation. All rights reserved.
on Linux (Ubuntu 16.04.1 LTS)

11. Let’s do more and Create a new Database, new Table and insert some sample records:
CREATE DATABASE SQLdbOnLinux
go

use SQLdbOnLinux
go
--Changed database context to 'SQLdbOnLinux'.
CREATE TABLE Test (i int, name varchar(25))
go
insert into Test values (1, 'Manoj')
insert into Test values (2, 'Saurabh')
go

--(1 rows affected)

--(1 rows affected)
select * from Test
go
--i           name
------------- -------------------------
--          1 Manoj
--          2 Saurabh

--(2 rows affected)

I think you would get amazed like me after using SQL Server on a Linux environment.
In my [next post] I’ll show how we can connect this SQL Linux instance from a Windows workstation via SSMS !!!
–> You can also watch this video on YouTube:
Spinning up a new Linux VM on Microsoft Azure
First of all a very very Happy New Year to all of you !!!
This is my first blog post in 2017, and I’ll start with the most happening thing with SQL Server, which is SQL Server for Linux.
So today first of all we will see how to setup a Linux VM on Microsoft Azure cloud. And in next posts I’ve show how can we Install & Setup SQL Server on Linux.
I will use Ubuntu Server 16.04 LTS (Xenial Xerus) version from Azure Marketplace, and show how to setup a Linux VM in a step by step process.
All you need is a Microsoft Azure account, if you have not setup, please do it from here.
1. Go to portal.azure.com and login with your credentials.
2. Click on the “+” icon, under “Marketplace” select Compute and under “Featured Apps” select Ubuntu Server.

3. The “Deployment Model” must be showing as Resource Manager by default, if not select form the drop-down list, and click on Create button.

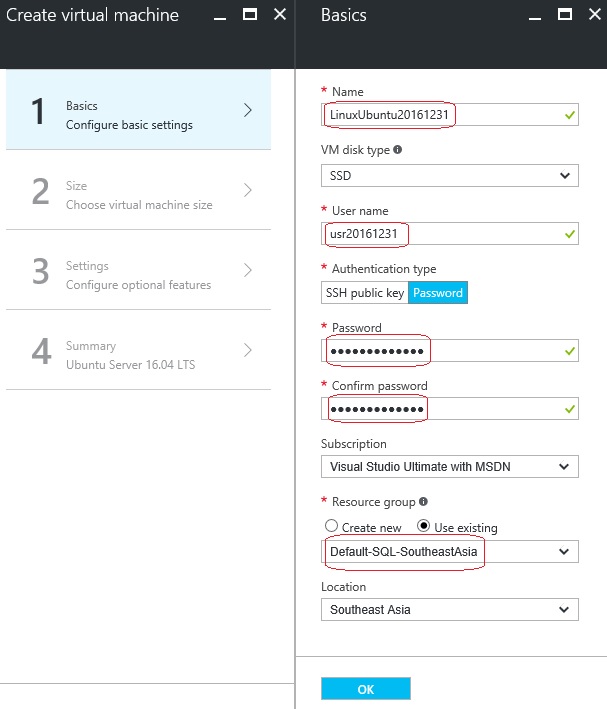
4. Now on the Create virtual machine window, under “1. Basic” section provide:
– Name: new name for your Linux VM
– VM disk type: select Disk type, SSD or HDD
– User name: provide a unique user name for Admin purpose
– Authentication type: I selected “Password”
– Password & Confirm password
– Subscription: will show you your current subscription
– Resource Group: Provide a new name or select from the drop-down list
– Location: select location as per your preference and available in the list.
… and click OK.
5. On “2. Size” section Choose a size for your VM. I selected the DS1_v2 Standard, the cheapest one, finally click on Select button.

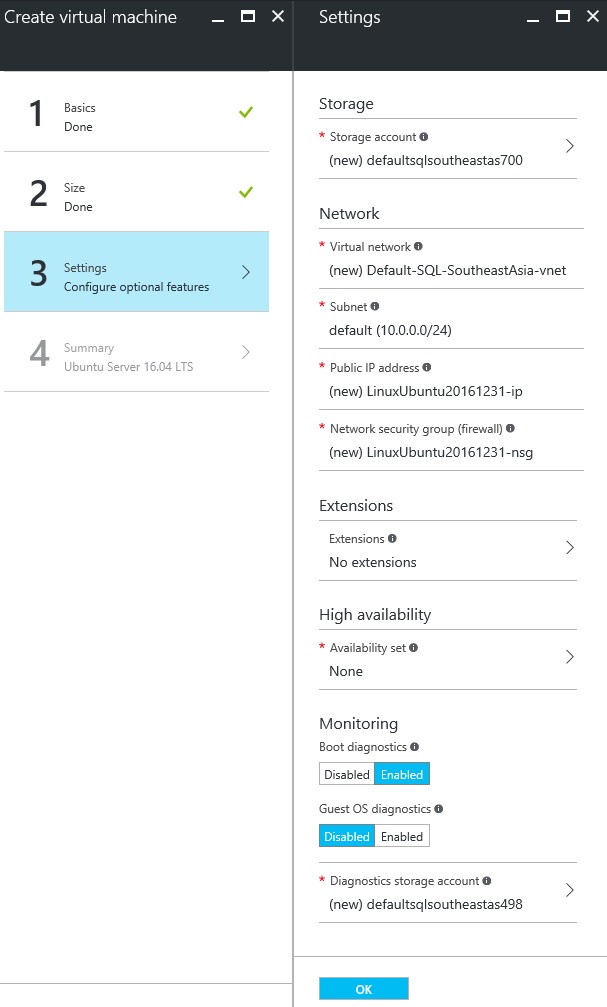
6. On 3. Settings section check the properties, I’ve left them as default for now, and click OK:
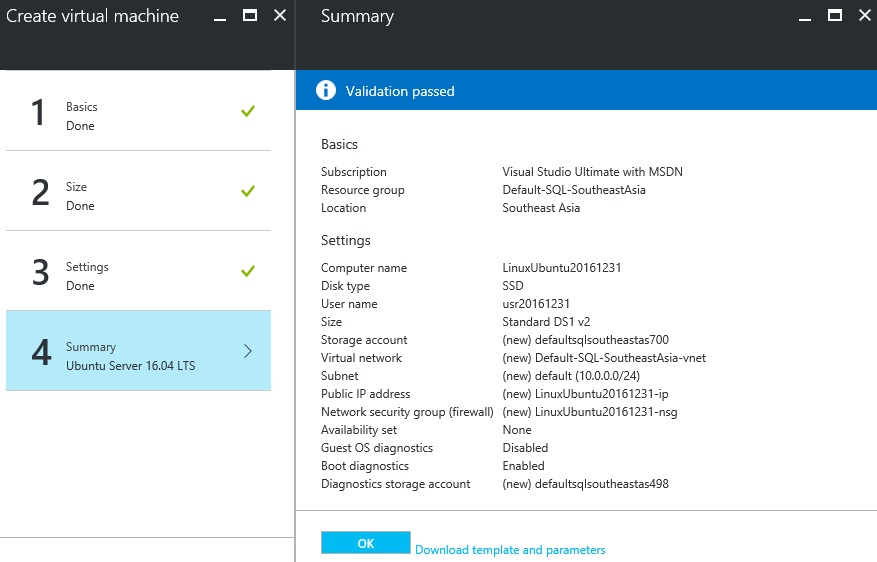
7. On the “4. Summary” section, the Portal will do various validations, just confirm all the settings and click OK.
8. And after few seconds or minutes your new Ubuntu Linux VM will be created and you can check the new widget appearing on your Dashboard as shown below:

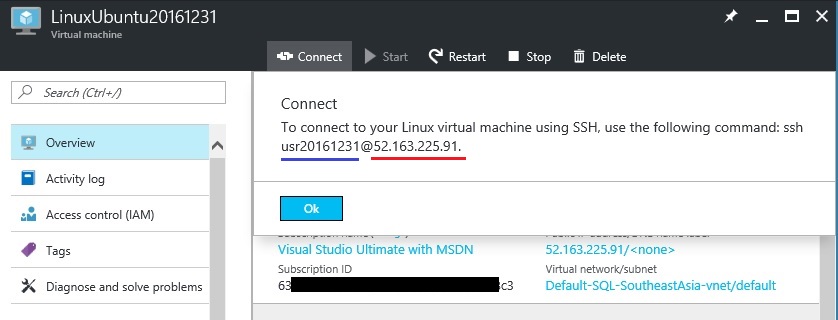
9. Now to get the NIC (network Interface Card) or the User Name & IP address of your VM, click on the widget.
It will open a new window where you can check all the details related to your new Linux VM.
Just click the Connect button at the top which will show you the details so that you can connect via SSH or Telnet.
10. Now to connect the Linux VM you can either:
a. SSH directly from a Mac or Linux Terminal workstation.
b. Or, if you are on a Windows workstation, you need to use PuTTY, MobaXTerm or Cygwin to SSH to the Linux Azure VM.
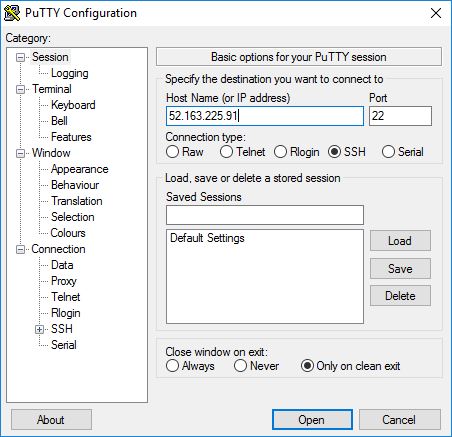
Here, we will try connecting from a Windows workstation, so we will download PuTTY from www.putty.org
The downloaded PuTTY is a simple EXE application, just open it. Here we will provide the IP address that we saw above, you can copy and paste it as shown below and click Open:
11. This will open a PuTTY command shell window which will prompt you to enter the Linux username & password that you set in previous steps, please apply as shown below:

12. After you successfully logged in you will see some welcome message from Ubuntu with other details.
Just to make sure I’m really connected to a Linux command shell, I tried executing a Unix command “ls /” to list all the files & directories in the root drive.

So, this is how you can simply Create or Spin up a Linux VM in few minutes !!!
In my [next post] I’ll setup or install SQL Server vNext on this Linux VM and show you how can we connect via SSMS from a Windows workstation.
–> You can also watch this on YouTube:
2016 blogging in review
Happy New Year 2017 from SQLwithManoj !!!
This time WordPress.com stats helper monkeys didn’t prepare annual report for any of their blogs for year 2016. So I prepared my own Annual Report.
–> Crunchy numbers

The Louvre Museum has 8.5 million visitors per year. This blog was viewed about 640,749 times by 396,212 unique visitors in 2016. If it were an exhibit at the Louvre Museum, it would take about 20 days for that many people to see it.
There were 117 pictures uploaded, taking up a total of 3.1 MB. That’s about 2-3 pictures per week.
The most popular post blogged in 2016 was SQL Server 2016 RTM full and final version available viewed 25,829 times.
–> Posting Patterns
In 2016, there were 52 new posts, growing the total archive of this blog to 416 posts.
LONGEST STREAK: 10 post each day, in March 2016
–> Attractions in 2016
These are the top 5 posts that got most views in 2016:
1. Passed 70-461 Exam : Querying Microsoft SQL Server 2012 (25,946 views)
2. SQL Server 2016 RTM full and final version available (25,829 views)
3. DB Basics – What are Candidate, Primary, Composite & Super Keys (17,189 views)
4. What is SQL, PL/SQL, T-SQL and difference between them (12,966 views)
5. SQL Basics – Difference between TRUNCATE, DELETE and DROP? (11,694 views)
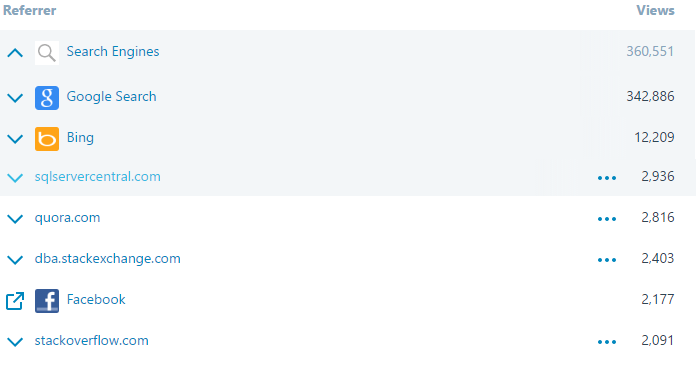
–> How did they find you?
The top referring sites and search engines in 2016 were:
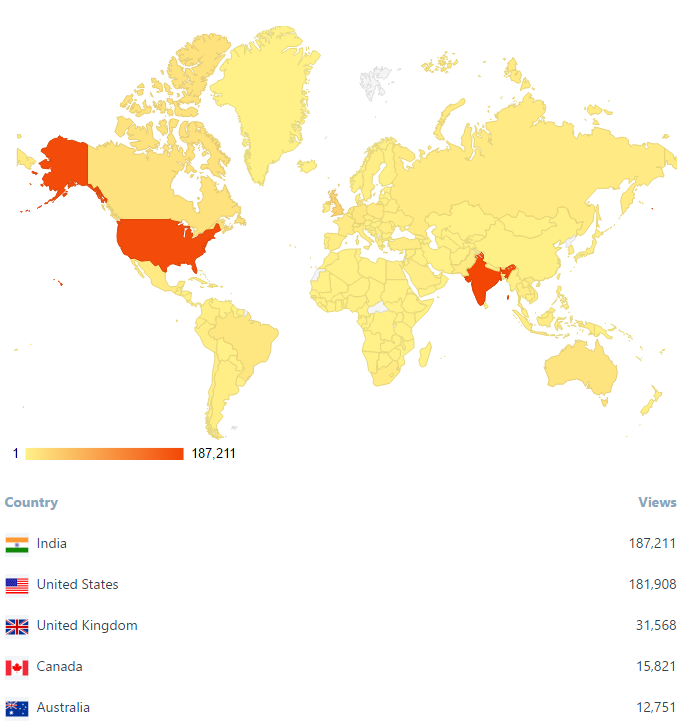
–> Where did they come from?
Out of 210 countries, top 5 visitors came from India, United States, United Kingdom, Canada and Australia:
That’s all for 2016, see you in year 2017, all the best !!!
Connect me on Facebook, Twitter, LinkedIn, YouTube, Google, Email
SQL Error – The ‘Microsoft.ACE.OLEDB.12.0’ provider is not registered on the local machine. (System.Data)
I was trying to export a SQL table to Excel and I got below error:
TITLE: SQL Server Import and Export Wizard
——————————
The operation could not be completed.
——————————
The ‘Microsoft.ACE.OLEDB.12.0’ provider is not registered on the local machine. (System.Data)
——————————

After searching a bit I came to know that the above provider is not installed, and I need to install the Microsoft Access Database Engine setup, to facilitate the transfer of data between existing Microsoft Office files such as “Microsoft Office Access 2010” (*.mdb and *.accdb) files and “Microsoft Office Excel 2010” (*.xls, *.xlsx, and *.xlsb) files to other data sources such as “Microsoft SQL Server”.
–> Get the Microsoft Access Database Engine 2010 Redistributable, [link].
There will be two files:
1. AccessDatabaseEngine (for. 32-bit)
2. AccessDatabaseEngine_x64 i.e. 64-bit
If your SQL Server is 32 bit, then install just the first one.
But if its 64 bit, then install both, first 32 bit & then 64 bit.
Windows Service stuck at “Starting” status
Today while installing an ETL utility one of the related Windows Service got stuck on Starting mode. I tried restarting the server 2-3 times but everytime it got stuck on “Starting” status. So to know what happening behind the scene I thought to check in Event Viewer.
–> You can open “Event Viewer” by any of the below options:
1. Shortcut: Eventvwr.msc
2. Type “Event Viewer” in search box on Windows 8 and above.
3. Open Control Panel –> System and Maintenance –> Administrative Tools –> Event Viewer
Now on the “Event Viewer” window go to: Windows Logs –> Application
Check the logs on the General or Details tab:
Timestamp: 12/14/2016 9:39:21 AM
Message: HandlingInstanceID: d87a52b3-0b01-4c7f-b044-06f00e02fb6a
An exception of type ‘System.Exception’ occurred and was caught.
—————————————————————-
12/14/2016 09:39:21
Type : System.Exception, mscorlib, Version=4.0.0.0, Culture=neutral, PublicKeyToken=b77a5c561934e089
Message : Service has not started for ‘6.0’ minutes due to unavailable/inaccessible SQL Server ‘SQL_Instance_name’ / Database ‘dbName’. Service will start once server / database is online or permissions are granted.ETLxyzService
The above error log means that the Service account that I was using to run the service was not setup on the SQL Server instance.
So, I added the Service account from SSMS, under Object Explorer –> Security –> Logins:
– General Tab: Provide the Service Account as Login name
– Server Role Tab: set as “sysadmin”
Now after few seconds the Service that was stuck on Starting mode changed to Running status.
So if you also observed similar “Starting” status for your service, there could similar or some other reason, but by checking on the “Event Viewer” you will get to know the exact reason and fix it !!!


![]()
Current Visitors

StatCounter …since April 2012

 Leisure blog: Creek & Trails
- NMDC Hyderabad Marathon – My first 42k FM, cramps, training and fuelling
- Singapore (Part 2) – 6 days itinerary, sightseeing & attractions
- Singapore (Part 1) – Tickets, Visa, Hotel, Forex Card/Cash, Metro/Bus cards
- I got full refund of my flight tickets during COVID lockdown (AirIndia via MakeMyTrip)
- YouTube – Your Google Ads account was cancelled due to no spend
- YouTube latest update on its YPP (YouTube Partner Program) which may affect your channel
- Starting your own blog !!!
- How to file ITR (Income Tax Return) online AY 2017-18 (for simple salaried)
- Scam – Become a kin/hier and earn a fortune – via LinkedIn and Email
- Places to visit in and around Vizag (aka Visakhapatnam)
